 NZD
NZD
 USD
USD
 EURO
EURO
 GBP
GBP
 HKD
HKD
 AUD
AUD
 CAD
CAD
 SGD
SGD
 CHF
CHF


Product Description
Technical Parameters
1)Frequency: 2.4GHz ISM band(2400MHz~2483.5MHz)
2)Size: 35*20*13mm
3)Channel: 6
4)Model: cars/boats
5)Modulation mode: GFSK
6)Spread spectrum: FHSS
7)10 modes memory storage
8)Antenna length: 200mm
9)Control distance: more than 400 meters
10)LCD screen: 128*64 resolution, LCD back light
11)Power supply: 4.8~10.0V DC
12)RF power: <10dbm
13)Channel resolution: 4096
14)Work current: 30mA
15)Compatible with transmitters: RC6GS, RC4GS, RC4G, RC3S, T8FB
Product Features
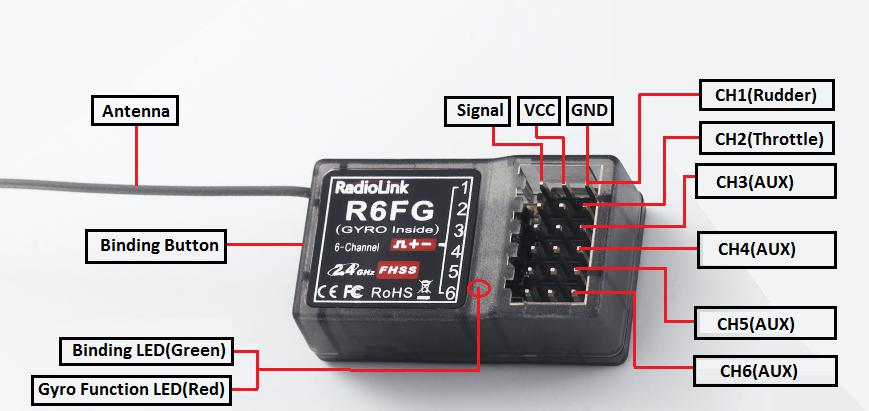
Radiolink R6FG, 2.4GHz 6 channels receiver, gyro integrated and HV servo supported.
Compatible with Radiolink 6 channels pistol grip radio RC6GS, 4 channels pistol grip radio RC4GS, RC4G, RC3S and 8 channels transmitter T8FB.
How to Match Code With Transmitter:
1. Put the transmitter and the receiver close to each other within 50 centimeters.
2. Turn on the transmitter, then power on the R6FG.
3. There is a black button on the R6FG, press the binding button twice in two seconds and release, receiver light start blinking, after about blinking 8 times, match code success then receiver signal LED always on!
Attention: R6FG default have not turn on the gyro function. Make sure the R6FG keep motionless when power on it, because the R6FG will do the self-test. R6FG with two indicate LED, green LED on indicate normal working mode while both green and red LED on indicate gyro function working mode.
Working Mode
R6FG has two working modes:normal working mode and gyro function working mode.
Normal Working Mode -- Green LED, gyro will not working.
Gyro Function Working Mode -- Both green and red LED on.
Receiver with gyro integrated to hold the vehicle in a straight line during aggressive acceleration and braking or get bumped around by rough terrain.
Receiver with gyro integrated to keep the uni-direction and anti-slip.
How to Turn On Gyro Function :
Quick press the ID SET switch two times within 1 second, the LED change from green to red means gyro function has turn on.
Gyro Function Setup
Resume
Integrated Gyro, is used to assure the stability of cars on turning status; and keep on straight running even the cars get some mechanical phantom. Gyro function can be enabled or disabled. PARAMETER INSTRUCTION
A. Gyro enabled
Gyro preset disabled, and it enters post indication status. There are two indicators on the receiver. The green one shows the receiver status and the red one is for gyro. When the led turns on, the gyro is enabled , and the led turns off, gyro disabled.
B. Gyro enabled forward
Cars can be drove forward and backward, gyro is enabled forward or backward correspondingly. Like the EP cars, different connection will make different direction, the gyro is ensured to be enable forward.
C. Gyro reverse
Same like a plane has reverse, car kit gyro has reverse as well. Only right set reverse gyro can act to correct.
Setup
1. Enable gyro
Press binding key three time (interval less than 1 second), the red LED will flash three time, indicating whether gyro is enabled.
2. Gyro sensitivity
Gyro sensitivity is predefined to adjust by channel three (factory set VR function), turning the VR switch clockwise to raise sensitivity and anti-clockwise to decrease.
3. Gyro forward
When the gyro is enabled, pull the throttle trigger and then release (make sure the car stops running), turn the car right or left without changing steering wheel, if the servo will not follow with, it shows gyro is set backward. Press the binding switch one time less than 1 second, the LED flashes red once, gyro is changed to act forward.
4. Gyro reverse
Set the gyro forward, turn the car right or left to see whether gyro functions. The wheel will turn left when the car is turned right and the wheel turns right when the car is turned left. If the gyro acts counter, press the binding switch two time, the LED flashes two time red, the gyro reverse is corrected.
Installment of receiver antenna:
1.The antenna must be kept as straight as possible. Otherwise it will reduce the effective range.
2.Large model aircraft may of some metal part interfering signal; in this case the antennas should be placed at both sides of the model. Then the best RF signal condition is obtained at any attitude.
3.The antennas must be kept away from conductive materials, such as metal and carbon by at least a half inch. The coaxial part of the antennas does not need to follow these guidelines, but do not bend it in a small radius.
4.Keep the antennas away from the motor, ESC, and other noise sources as much as possible.
5.Press and hold the Easy Link (ID SET) one second, now the receiver starts work.
6.After all of the above steps finished, the LED indicator will turn and keep in red/green.
7.The receiver can be packed by sponge or foam for shocking proof when it is installed to the model.
After all of the above steps finished, turn off the transmitter and then power it on, now the program functions to assure it under control of transmitter with a right connection.


")
")


")
")